In our previous lesson, we got our first taste of running computer vision jobs on the Hadoop library using the MapReduce paradigm, Python, and the Hadoop Streaming API. We also defined a reusable project structure that can be utilized anytime we need to construct a MapReduce job.
To demonstrate the utility of our project structure, today we are going to take another look at running computer vision jobs on MapReduce — this time, we’ll apply feature extraction and quantify the contents of a set of images using keypoint detection and local invariant descriptors.
Objectives:
In this lesson, we will:
- Define a MapReduce job that can be used to detect keypoints and extract local invariant descriptors.
High-throughput feature extraction
As we have seen throughout our CBIR module, keypoints and local invariant descriptors are critical for building high accuracy and scalable image search engines.
However, the task of extracting features can be quite time consuming. Perhaps there is a way to speed this process up?
Indeed, there is!
Feature extraction is inherently a task that can be made parallel. To start, you might want to use a multiprocessing library to split feature extraction across your system bus and multiple cores of your processors.
If that still isn’t enough speed, then you should consider setting up a Hadoop cluster to perform feature feature extraction. There is a lot of overhead in running a MapReduce job — but once you get the job started, it can process images extremely quickly.
In the remainder of this lesson, we’ll review how to create an image description pipeline and run it on Hadoop. Specifically, we’ll learn how to detect Fast Hessian keypoints and extract RootSIFT descriptors, just like we have done in our CBIR lessons — only this time, we’ll be leveraging the power of Hadoop and MapReduce.
Defining our project
To start, let’s briefly review our project structure:
|--- deploy
|    |--- pyimagesearch.zip
|--- jobs
|    |--- feature_extractor_run.sh
|--- output
|--- pyimagesearch
|    |--- __init__.py
|    |--- descriptors
|    |    |--- __init__.py
|    |    |--- detectanddescribe.py
|    |--- hadoop
|    |    |--- __init__.py
|    |    |--- mapper
|    |    |    |--- __int__.py
|    |    |    |--- mapper.py
|    |    |--- reducer
|    |    |    |--- __int__.py
|    |    |    |--- reducer.py
|--- sbin
|    |--- deploy.sh
|    |--- start_stack.sh
|    |--- stop_stack.sh
|--- config.sh
|--- feature_extractor_demo.py
|--- feature_extractor_mapper.py
|--- prepare_image_dataset.py
Notice how we are re-using many of the components of the framework that we defined in our previous lesson on high-throughput face detection. In fact, the only new additions to our project are:
- descriptors : A sub-module of pyimagesearch containing the code we need to detect keypoints and extract features.
- feature_extractor_mapper.sh : The driver shell script used to execute our MapReduce job.
- feature_extractor_mapper.py : The Python script used to parse the input dataset, extracting keypoints and local invariant descriptors, followed by emitting them as output.
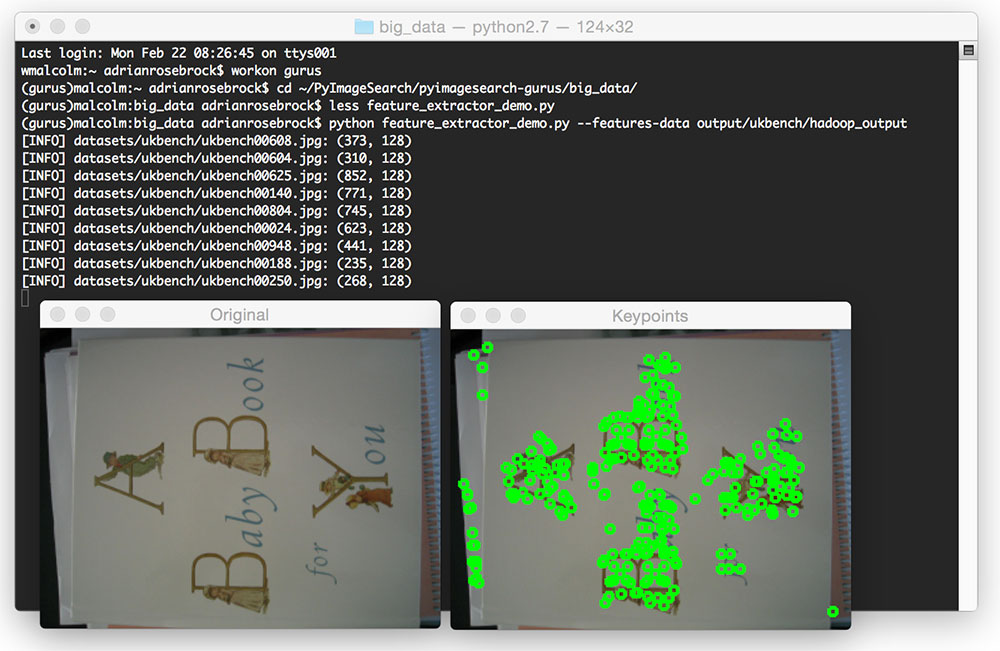
- feature_extractor_demo.py : A simple Python script that we can use to verify that we have successfully detected and extracted features from our images.
We’ll be reviewing the implementation of the additions throughout the remainder of this lesson.
Feature extraction
Detecting Fast Hessian keypoints and extracting local invariant descriptors will be handled by our detectanddescribe.py file along with our imutils.feature package.
We have reviewed these files extensively in previous lessons, so if you need a refresher on RootSIFT, consult this lesson. And if you need help with DetectAndDescribe , read through this tutorial.
The feature extractor mapper
We are now ready to define the heart of our MapReduce job — the feature_extractor_mapper.py . This file will accept input from the Hadoop Streaming utility, deserialize the image, detect keypoints, and extract local invariant descriptors, followed by emitting the output to stdout.
Let’s see how it’s done:
#!/usr/bin/env python

# import the necessary packages
import sys

# import the zipped packages and finish import packages
sys.path.insert(0, "pyimagesearch.zip")
from pyimagesearch.hadoop.mapper import Mapper
from pyimagesearch.descriptors import DetectAndDescribe
from imutils.feature import FeatureDetector_create, DescriptorExtractor_create
import imutils
import cv2
Again, note the use of the shebang at the top of our Python script to indicate that this is an executable file. We then import our pyimagesearch.zip archive and subsequently import any required Python packages.
(2018-01-17) Update for OpenCV 3+: Notice the imports from imutils.feature . This factory handles differences between OpenCV 2.4 and OpenCV 3. This is first introduced in Module 10, Lesson 10.11.4. I encourage you to check out that lesson if you haven’t already. I also highly encourage you to look at how the feature factory works over on GitHub.
We are now ready to define our main job method, used to read input from stdin and push output to stdout:
def job():
	# initialize the keypoint detector, local invariant descriptor, and the
	# descriptor
	# pipeline
	detector = FeatureDetector_create("SURF")
	descriptor = DescriptorExtractor_create("RootSIFT")
	dad = DetectAndDescribe(detector, descriptor)

	# loop over the lines of input
	for line in Mapper.parse_input(sys.stdin):
		# parse the line into the image ID, path, and image
		(imageID, path, image) = Mapper.handle_input(line.strip())

		# describe the image and initialize the output list
		image = cv2.cvtColor(image, cv2.COLOR_BGR2GRAY)
		image = imutils.resize(image, width=320)
		(kps, descs) = dad.describe(image)
		output = []

		# loop over the keypoints and descriptors
		for (kp, vec) in zip(kps, descs):
			# update the output list as a 2-tuple of the keypoint (x, y)-coordinates
			# and the feature vector
			output.append((kp.tolist(), vec.tolist()))

		# output the row to the reducer
		Mapper.output_row(imageID, path, output, sep="\t")

# handle if the job is being executed
if __name__ == "__main__":
	job()
Lines 18-20 define our actual feature extraction pipeline, consisting of the Fast Hessian keypoint detector and the RootSIFT local invariant descriptor.
Line 23 starts looping over input from stdin, calling parse_input to break the line into a 3-tuple of the image ID, path to the original image, and image itself.
Now that our image has been deserialized, Lines 28-30 handle converting the image to grayscale, resizing it, and extracting keypoints and features.
Lines 34-37 loop over the set of keypoints and features, constructing 2-tuple of (x, y)-coordinates and the RootSIFT feature vector.
Finally, the row is serialized and emitted to stdout in Line 40.
Be sure to make the feature_extractor_mapper.py file executable using chmod +x :
$ chmod +x feature_extractor_mapper.py
Loading the UKBench dataset into HDFS
Before we can run our MapReduce job, we first need to serialize the UKBench dataset:
$ python prepare_image_dataset.py --dataset datasets/ukbench \
	--output output/ukbench/ukbench_dataset.txt
Followed by loading it into HDFS:
$ bin/hdfs dfs -mkdir /user/guru/ukbench
$ bin/hdfs dfs -mkdir /user/guru/ukbench/input
$ bin/hdfs dfs -mkdir /user/guru/ukbench/output
$ bin/hdfs dfs -copyFromLocal \
	~/PyImageSearch/pyimagesearch-gurus/big_data/output/ukbench/ukbench_dataset.txt \
	/user/guru/ukbench/input
Creating the MapReduce driver script
The last step is to define our driver shell script used to execute our feature extraction pipeline on Hadoop.
Let’s take a look at this driver script:
#!/bin/sh

# grab the current working directory
BASE=$(pwd)

# create the latest deployable package
sbin/deploy.sh

# change directory to where Hadoop lives
cd $HADOOP_HOME

# (potentially optional): turn off safe mode
bin/hdfs dfsadmin -safemode leave

# remove the previous output directory
bin/hdfs dfs -rm -r /user/guru/ukbench/output

# define the set of local files that need to be present to run the Hadoop
# job -- comma separate each file path
FILES="${BASE}/feature_extractor_mapper.py,\
${BASE}/deploy/pyimagesearch.zip"
Line 4 grabs the current working directory, which in this case should be the folder that contains our implementation of the feature extraction Hadoop project. We then construct the pyimagesearch.zip archive on Line 7 by calling deploy.sh .
We then change directory to HADOOP_HOME , leave safe mode, and then delete any previous output directory on HDFS (Lines 10-16).
Next, we need to construct the set of local FILES that need to be included with our MapReduce job. This comma separated list includes the feature_extractor_mapper.py file along with the archived pyimagesearch.zip file.
Be sure to make the driver script executable:
$ chmod +x jobs/feature_extractor_mapper.sh
From there, we can execute the job (provided that you have Hadoop and HDFS running, of course):
$ jobs/feature_extractor_mapper.sh
Verifying our results
After our MapReduce job has completed, we can verify the output by listing the directory contents on HDFS:
$ bin/hdfs dfs -ls /user/guru/ukbench/output
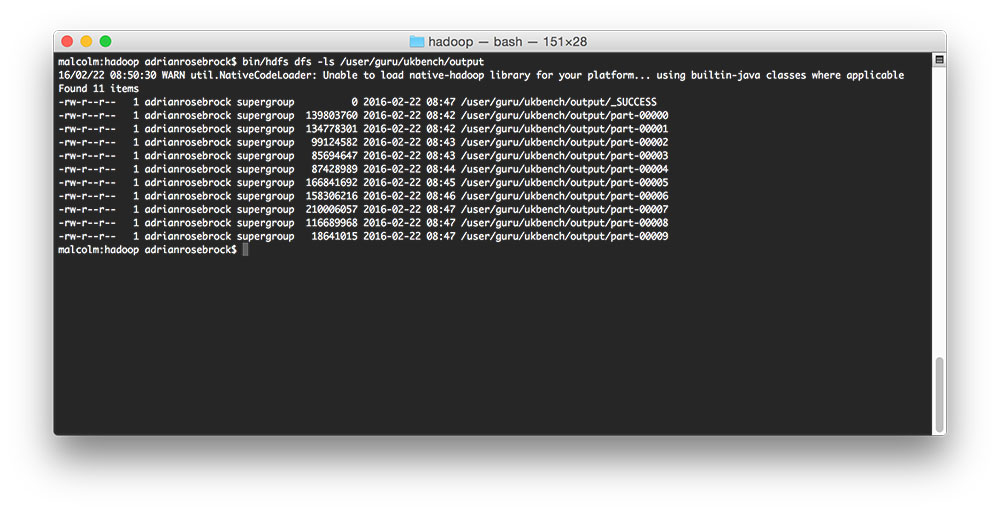
As we can see, we have the _SUCCESS file, followed by many part-* files.
Let’s copy these output files from HDFS to our local system:
$ bin/hdfs dfs -copyToLocal /user/guru/ukbench/output \
	~/PyImageSearch/pyimagesearch-gurus/big_data/output/ukbench/hadoop_output
Opening up one of the part-* files, we see that each file is simply a TSV (Tab-separated values), containing the image ID, original path, and set of keypoints and feature vectors:
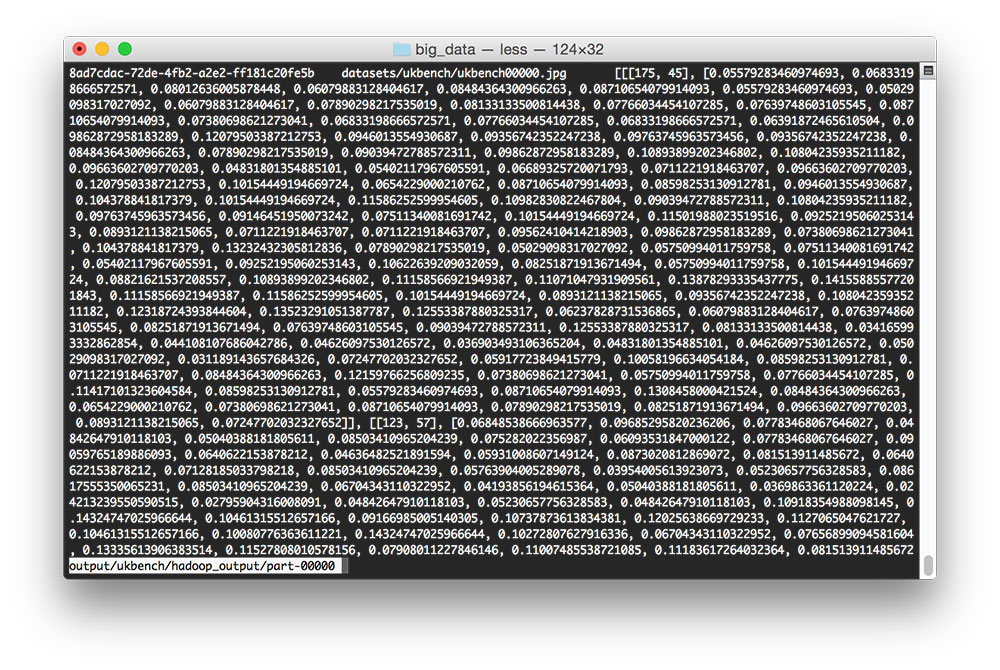
From here, we could write a Python script to digest the keypoints and features into an HDF5 dataset, like we have done in our CBIR lessons. But for the time being, let’s look at a Python script that demonstrates we have successfully extracted the keypoints and features:
# import the necessary packages
from __future__ import print_function
import numpy as np
import argparse
import imutils
import random
import glob
import json
import cv2

# construct the argument parser and parse the arguments
ap = argparse.ArgumentParser()
ap.add_argument("-f", "--features-data", required=True, help="path to the features output directory")
ap.add_argument("-s", "--sample", type=int, default=10, help="# of features samples to use")
args = vars(ap.parse_args())

# grab the list of parts files
partsFiles = list(glob.glob(args["features_data"] + "/part-*"))
Lines 2-9 import our required Python packages while Lines 12-15 parse our required Python arguments. The first argument, –features-data , is simply the path to the part-* files residing locally on disk. The –sample switch controls the number of images we are going to sample and visually verify.
From there, Line 18 grabs the path to all part-* files on disk.
# import the necessary packages
from __future__ import print_function
import numpy as np
import argparse
import imutils
import random
import glob
import json
import cv2

# construct the argument parser and parse the arguments
ap = argparse.ArgumentParser()
ap.add_argument("-f", "--features-data", required=True, help="path to the features output directory")
ap.add_argument("-s", "--sample", type=int, default=10, help="# of features samples to use")
args = vars(ap.parse_args())

# grab the list of parts files
partsFiles = list(glob.glob(args["features_data"] + "/part-*"))

# loop over the random number of images to sample
for i in range(0, args["sample"]):
	# randomly sample one of the features files, then load the output file
	p = random.choice(partsFiles)
	d = open(p).read().strip().split("\n")

	# randomly sample a row and unpack it
	row = random.choice(d)
	(imageID, path, features) = row.strip().split("\t")
	features = json.loads(features)

	# load the image and resize it
	image = cv2.imread(path)
	image = imutils.resize(image, width=320)
	orig = image.copy()
	descs = []

	# loop over the keypoints and features
	for (kp, vec) in features:
		# draw the keypoint on the image, then update the list of descriptors
		cv2.circle(image, (kp[0], kp[1]), 3, (0, 255, 0), 2)
		descs.append(vec)

	# show the image
	print("[INFO] {}: {}".format(path, np.array(descs).shape))
	cv2.imshow("Original", orig)
	cv2.imshow("Keypoints", image)
	cv2.waitKey(0)
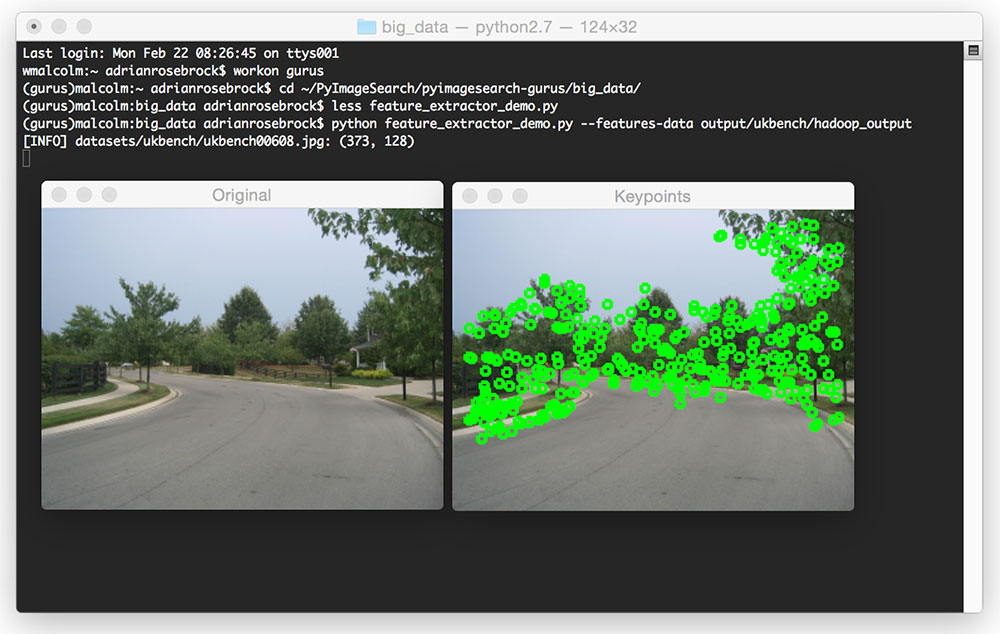
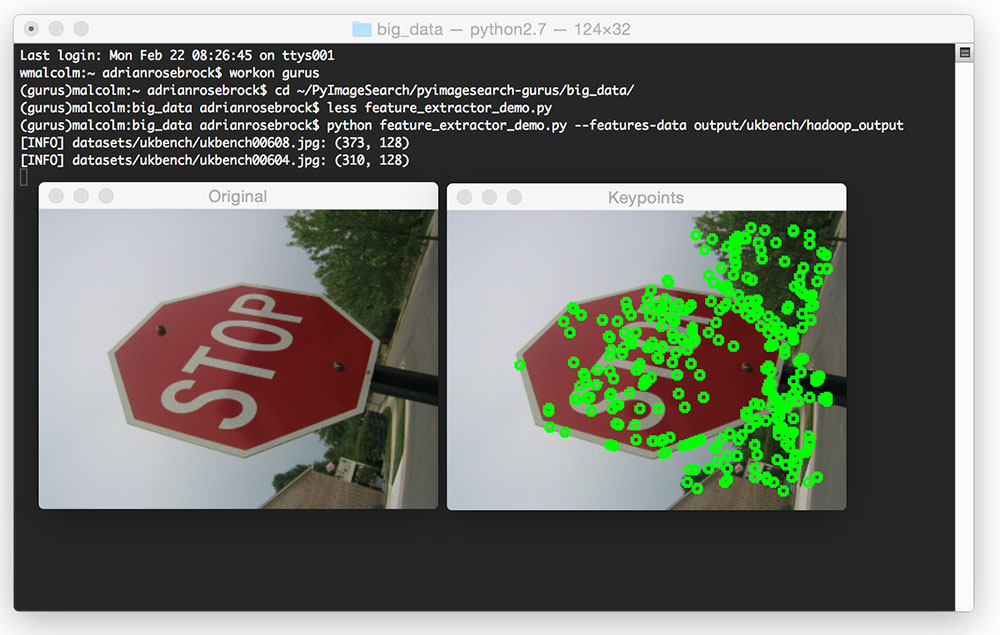
Line 21 randomly loops over a set of images to sample. We choose a part-* file and then load it (Lines 23 and 24). A row from the selected file is then randomly sampled and unpacked (Lines 27-29).
Lines 32-34 load the image from disk, while Lines 38-41 draw the detected keypoints on the image.
Finally, Lines 44-47 display the output image.
To execute the feature_extractor_demo.py script, just issue the following command:
$ python feature_extractor_demo.py --features-data output/ukbench/hadoop_output
Summary
In this lesson, we learned how to use our Python + Hadoop Streaming API framework to detect keypoints and extract local invariant descriptors from a set of images.
In general, you’ll first want to parallelize your feature extraction code across the system bus and multiple cores of your processors. Feature extraction is inherently a task that can be made parallel — and it often runs very quickly on a single system with lots of available processor cores.
However, in the event that a single system is not fast enough, you should consider using big data tools such as Hadoop to parallelize feature extraction across multiple nodes in a Hadoop cluster. While there is a lot of overhead in actually starting a Hadoop job (hence why I recommend parallelizing across the system bus first), once the job is up and running, it can chew through an entire dataset of images quickly.