In this project, we’ll learn how to perform face recognition on the Raspberry Pi and create a simple security system that can send us text message alerts when intruders enter our video stream.
To accomplish this project, we’ll be using the following:
- Our knowledge (and not to mention, implementations) from the PyImageSearch Gurus modules on face recognition.
- Amazon Simple Storage Service (S3) to upload images of intruders to the cloud.
- The Twilio API to take uploaded photos and automatically send them to our smartphone, instantly alerting us when intruders enter a protected space.
Specifically, I’ll be setting up my Raspberry Pi to monitor my office area. I’m not going to lie — I’m extremely nitpicky when it comes to my office space. And I hate when other people sit in my chair, move stuff around on my desk, or touch my keyboard/mouse.
One of the most irritating sensations in the world is touching a greasy keyboard or mouse — so if you haven’t washed your hands, stay away from my desk!
But in all seriousness, this project will be directly applicable to any area that you want to monitor using face recognition. In the remainder of this lesson, I’ll show you exactly how to set up such a security cam using the Raspberry Pi, Amazon S3, and the Twilio API.
Objectives:
In this lesson, we will:
- Leverage our knowledge of face recognition and apply it to the Raspberry Pi.
- Determine if an intruder has entered the view of the Raspberry Pi camera, and if so:
- Upload a photo of the intruder to Amazon S3.
- Instantly send a photo of the intruder to our smartphone.
Face recognition for security
The face is arguably the most defining characteristic of the human body. Every person’s face is unique. And while we all have two eyes, two ears, a noise, and a mouth (barring any birth defects or accidents) — our facial structure can vary dramatically. It’s within this variance which lies the distinguishing characteristics that be used to identify one person from another.
Inside our lessons on face recognition, we learned how to apply Local Binary Patterns and a bit of machine learning to automatically classify faces in images and video streams. Today, we are going to build upon our knowledge of face recognition and leverage the Raspberry Pi to build a simple security camera.
Before we get started, let’s look at our project structure:
|--- cascades
|--- conf
|    |--- alerts.json
|--- output
|    |--- classifier
|    |--- faces
|--- pyimagesearch
|    |--- __init__.py
|    |--- face_recognition
|    |    |--- __init__.py
|    |    |--- facedetector.py
|    |    |--- facerecognizer.py
|    |--- notifications
|    |    |--- __init__.py
|    |    |--- twilionotifier.py
|    |--- utils
|    |    |--- __init__.py
|    |    |--- conf.py
|--- gather_selfies.py
|--- security_cam.py
|--- train_recognizer.py
Inside the cascades directory, we will store the Haar cascades used by OpenCV to detect faces in images.
The conf directory will store our JSON configuration file, used to store important variables such as our Amazon SWS, S3, and Twilio authentication parameters.
Inside the pyimagesearch module, we have the face_recognition sub-module, which will implement all necessary logic to (1) train a face recognizer and (2) identify faces in a video stream.
We then have the notifications module, which stores our TwilioNotifier class. This class is responsible for taking an image, uploading it to S3, and then sending a text message notification via the Twilio API.
In order to create our security system, we’ll need three Python driver scripts: gather_selifes.py , train_recognizer.py , and security_cam.py .
To gather face examples, we first need to run gather_examples.py to collect training data for each person we want to identify.
The train_recognizer.py script can then be executed to train an LBP-based face recognizer on top of the face samples.
Finally, we can launch security_cam.py to monitor our video stream for faces, and if one is found, we can attempt to identify it. If the face cannot be identified, this script will handle passing the image to the TwilioNotifier , where we’ll send a text message notification to our smartphone.
Gathering face examples
The first step in building our face recognizer is to run gather_examples.py to collect examples of each face we want to identify. This script is identical to our previous lesson on gathering selfies, but with one exception — we have updated it to use the unified VideoStream class (that is compatible with both builtin/USB webcams along with the Raspberry Pi camera module) instead of the standard cv2.VideoCapture method. You can read more about the VideoStream class in this blog post on PyImageSearch.com.
Since the implementation of the gather_selfies.py is essentially identical to our previous lesson, we won’t be reviewing the source code in this section. Please use the “Downloads” section at the bottom of this tutorial to review the (very small) updates.
In any case, if you are using a USB camera connected to your Raspberry Pi to gather selfies, execute the following command:
$ python gather_selfies.py --face-cascade cascades/haarcascade_frontalface_default.xml \
	--output output/faces/adrian.txt
Otherwise, you must be using the Raspberry Pi camera module, so be sure to supply the –picamera 1 switch:
$ python gather_selfies.py --face-cascade cascades/haarcascade_frontalface_default.xml \
	--output output/faces/adrian.txt --picamera 1
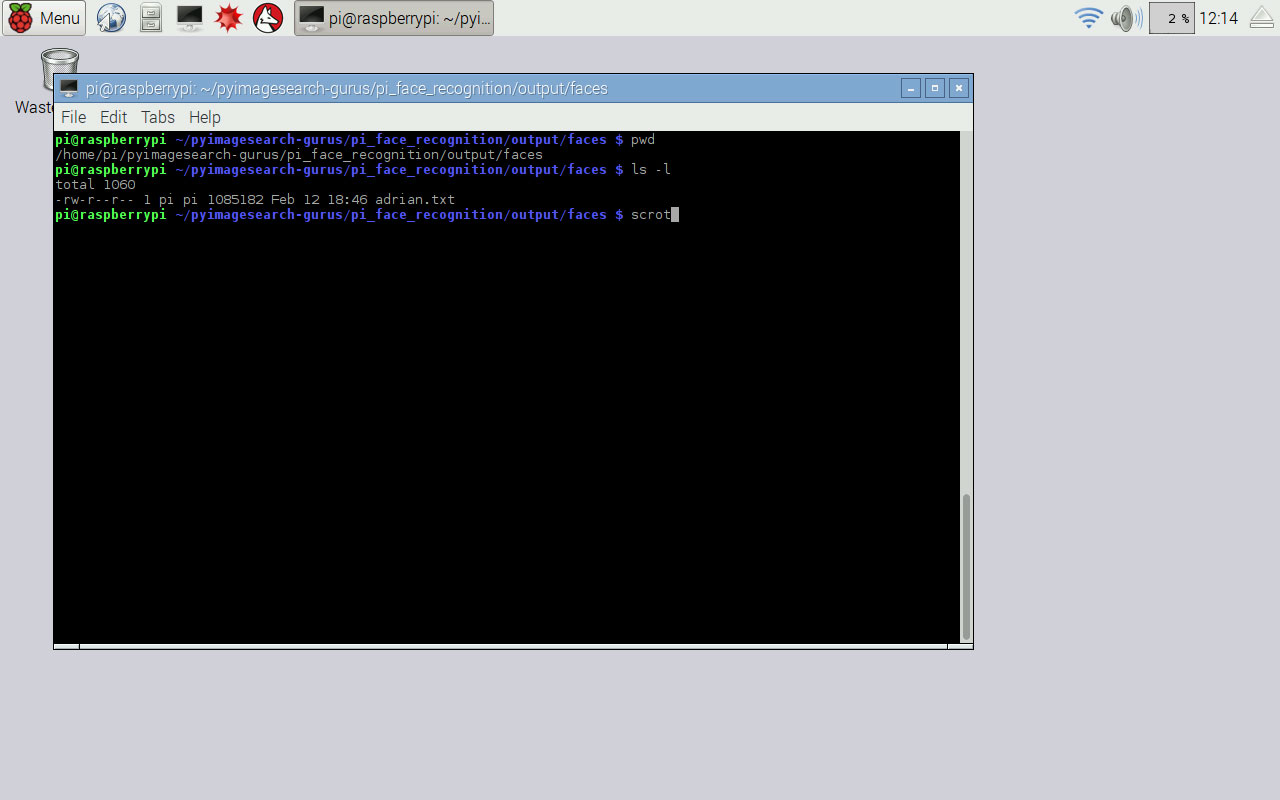
After gathering selfies, your output/faces directory should contain a .txt file for each face that you want to recognize:
Training your face recognizer
Our train_recognizer.py implementation is identical to our previous lesson on the complete face recognition pipeline. To execute it, just issue the following command:
$ python train_recognizer.py --selfies output/faces --classifier output/classifier --sample-size 100
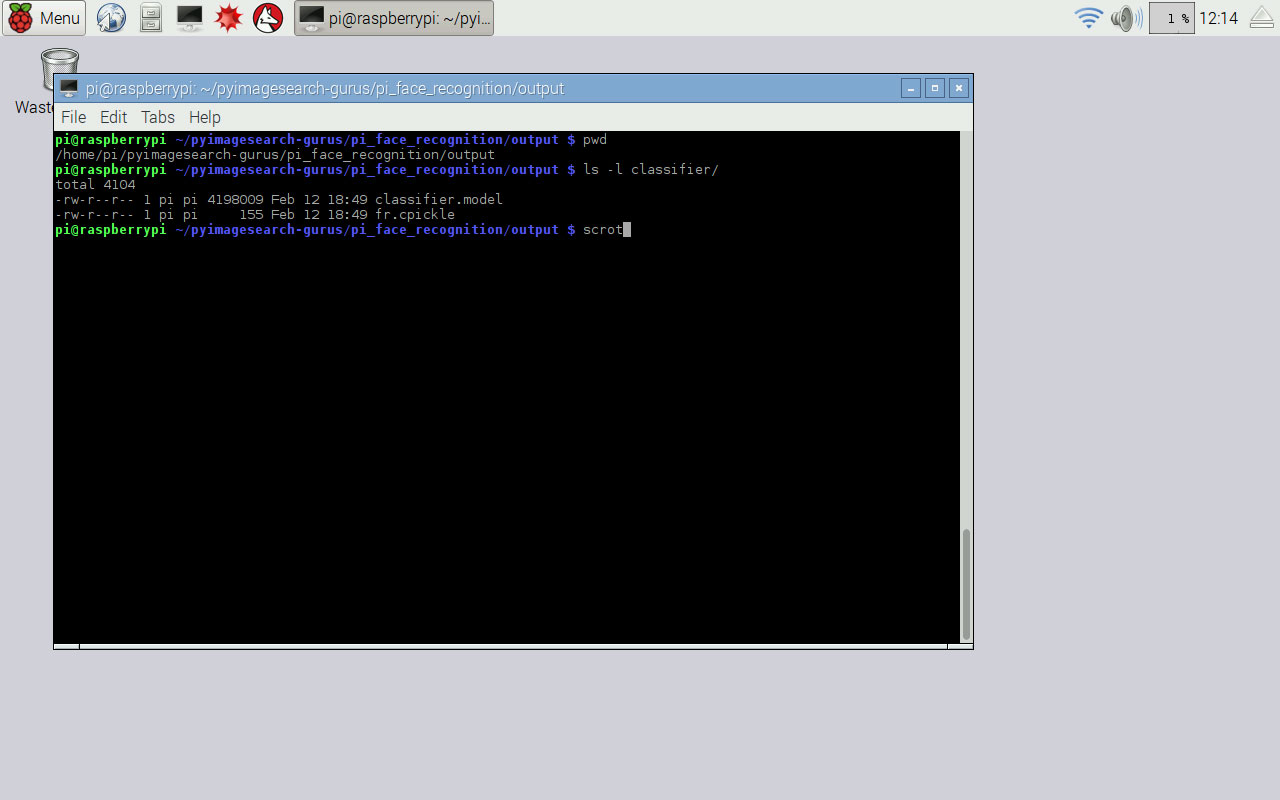
You should now have the output classifier stored in your output/classifier directory:
Twilio and Amazon S3
In order to send text message notifications containing images of an intruder to our smartphone, we’ll be using the Twilio API. The Twilio API is free (with some minor restrictions) and is very simple to use.
To start, head over to the Twilio website and register for an account. After registering, Twilio will automatically assign you a phone number that you can use for sending messages. You’ll also want to grab your AccountSID and AuthToken which are the credentials used to access the Twilio API. You can find the AccountSID and AuthToken on your Twilio Account page.
Sending a text message (with an image attachment) is quite simple. First, install the twilio and boto (Amazon AWS) Python packages:
$ pip install twilio boto
From there, you can send a media message using the following code snippet:
$ python
>>> from twilio.rest import Client
>>> TWILIO_SID = "fill this in with your SID from account page"
>>> TWILIO_AUTH = "fill this in with your AUTH KEY from account page"
>>> client = Client(TWILIO_SID, TWILIO_AUTH)
>>> TO = "+15554443210"
>>> FROM "fill this in with your Twilio phone number"
>>> client.messages.create(to=TO, from_=FROM, body="Hello!",
	media_url="https://customers.pyimagesearch.com/wp-content/uploads/2015/03/pyimagesearch_gurus_logo.png")
>>>
Notice how we need to supply a media_url to the client.messages.create function — this is the URL (on a public server) that contains the image we want to send in our text message.
If you already have a public server, then you can certainly upload images to it programmatically. But if you don’t have a public-facing server (or would rather use a simple Python-based API), then you’ll want to set up Amazon S3.
Amazon Simple Storage Service (S3) is an online file storage service hosted by Amazon Web Services. Storage is organized into “buckets”, where each bucket can store a set of files.
Amazon S3 is not free, but is extremely cheap, coming in at < $0.15 per gigabyte of storage per month plus bandwidth costs. In short, you can easily run a custom home security system using Twilio + Amazon S3 for less than the cost of a pack of gum at your local convenience store.
To read more about Amazon S3 and set up your first bucket, be sure to read through this tutorial. Otherwise, if you are already familiar with S3, let’s keep going.
Constructing your security camera
We’ll start constructing our security camera system by implementing the TwilioNotifier class, detailed below:
# import the necessary packages
from twilio.rest import Client
from boto.s3.connection import S3Connection
from boto.s3.key import Key
from threading import Thread
from imutils.io import TempFile
import cv2

class TwilioNotifier:
	def __init__(self, conf):
		# store the configuration object
		self.conf = conf
Lines 2-7 handle importing our required Python packages. If you have not installed twilio and boto yet, you’ll want to do that using the command detailed in the previous section.
The constructor to our TwilioNotifier class simply stores a configuration object (i.e., a Python dictionary).
Let’s move on to the send method:
# import the necessary packages
from twilio.rest import Client
from boto.s3.connection import S3Connection
from boto.s3.key import Key
from threading import Thread
from imutils.io import TempFile
import cv2

class TwilioNotifier:
	def __init__(self, conf):
		# store the configuration object
		self.conf = conf

	def send(self, image):
		# create a temporary path for the image and write it to file
		tempImage = TempFile()
		cv2.imwrite(tempImage.path, image)

		# start a thread to upload the file and send it
		t = Thread(target=self._send, args=(tempImage,))
		t.daemon = True
		t.start()
Our send function requires only a single parameter, the image that we want to send via text message. Lines 16 and 17 take this image and construct a temporary file for it.
Lines 20-22 then create a separate thread used to upload the image to S3 and then send it over the wire via the Twilio API. We use threading in this case, so we don’t slow down our main video processing pipeline due to I/O latency.
Notice how the Thread makes a call to a _send function. Let’s define it below:
# import the necessary packages
from twilio.rest import Client
from boto.s3.connection import S3Connection
from boto.s3.key import Key
from threading import Thread
from imutils.io import TempFile
import cv2

class TwilioNotifier:
	def __init__(self, conf):
		# store the configuration object
		self.conf = conf

	def send(self, image):
		# create a temporary path for the image and write it to file
		tempImage = TempFile()
		cv2.imwrite(tempImage.path, image)

		# start a thread to upload the file and send it
		t = Thread(target=self._send, args=(tempImage,))
		t.daemon = True
		t.start()

	def _send(self, tempImage):
		# connect to S3 and grab the bucket
		s3 = S3Connection(self.conf["aws_access_key_id"], self.conf["aws_secret_access_key"])
		bucket = s3.get_bucket(self.conf["s3_bucket"])

		# upload the file, make it public, and generate a URL for the file
		k = Key(bucket)
		k.key = tempImage.path[tempImage.path.rfind("/") + 1:]
		k.set_contents_from_filename(tempImage.path)
		k.make_public()
		url = k.generate_url(expires_in=300)

		# connect to Twilio and send the file via MMS
		client = Client(self.conf["twilio_sid"], self.conf["twilio_auth"])
		client.messages.create(to=self.conf["twilio_to"], from_=self.conf["twilio_from"],
			body=self.conf["message_body"], media_url=url)

		# delete the temporary file
		tempImage.cleanup()
Lines 26 and 27 connect to Amazon S3 using our supplied credentials (which we’ll store later in a JSON configuration file), followed by grabbing our bucket .
Once we have our bucket , we then create a new file using the Key class by uploading the image to S3, making it public, and finally generating a URL for it.
Lastly, Lines 37-39 send a text message containing the photo using the Twilio API. Line 42 then deletes the temporary file.
The next step is to implement our security_cam.py driver script:
# import the necessary packages
from __future__ import print_function
from pyimagesearch.face_recognition import FaceDetector
from pyimagesearch.face_recognition import FaceRecognizer
from pyimagesearch.notifications import TwilioNotifier
from pyimagesearch.utils import Conf
from imutils.video import VideoStream
import argparse
import datetime
import imutils
import time
import cv2

# construct the argument parser and parse command line arguments
ap = argparse.ArgumentParser()
ap.add_argument("-c", "--conf", required=True, help="path to configuration file")
ap.add_argument("-f", "--face-cascade", required=True, help="path to face detection cascade")
ap.add_argument("-m", "--classifier", required=True, help="path to the classifier")
ap.add_argument("-t", "--confidence", type=float, default=100.0,
	help="maximum confidence threshold for positive face identification")
ap.add_argument("-n", "--consec-frames", type=int, default=90,
	help="# of consecutive frames containing an unknown face before sending alert")
ap.add_argument("-p", "--picamera", type=int, default=-1,
	help="whether or not the Raspberry Pi camera should be used")
args = vars(ap.parse_args())
Lines 2-12 handle importing our required Python packages along with parsing our command line arguments, which are detailed below:
- –conf : This is the path to our JSON configuration file.
- –face-cascade : The path to our Haar cascade used for face detection.
- –classifier : Here, we specify the path to the classifier containing our (already trained) LBP-based face identifier.
- –confidence : This parameter controls the threshold we use for marking a face as “Unknown”. You can read more about this parameter in this lesson on setting up a complete face recognition pipeline.
- –consec-frames : Here, we can supply an integer specifying the minimum number of consecutive frames containing an unknown face that must be met prior to sending an alert.
- –picamera : Finally, this value controls where we are using a USB camera or the Raspberry Pi camera module.
Our next step is to perform a series of initializations:
# import the necessary packages
from __future__ import print_function
from pyimagesearch.face_recognition import FaceDetector
from pyimagesearch.face_recognition import FaceRecognizer
from pyimagesearch.notifications import TwilioNotifier
from pyimagesearch.utils import Conf
from imutils.video import VideoStream
import argparse
import datetime
import imutils
import time
import cv2

# construct the argument parser and parse command line arguments
ap = argparse.ArgumentParser()
ap.add_argument("-c", "--conf", required=True, help="path to configuration file")
ap.add_argument("-f", "--face-cascade", required=True, help="path to face detection cascade")
ap.add_argument("-m", "--classifier", required=True, help="path to the classifier")
ap.add_argument("-t", "--confidence", type=float, default=100.0,
	help="maximum confidence threshold for positive face identification")
ap.add_argument("-n", "--consec-frames", type=int, default=90,
	help="# of consecutive frames containing an unknown face before sending alert")
ap.add_argument("-p", "--picamera", type=int, default=-1,
	help="whether or not the Raspberry Pi camera should be used")
args = vars(ap.parse_args())

# load the configuration file and initialize the Twilio notifier
conf = Conf(args["conf"])
tn = TwilioNotifier(conf)

# initialize the video stream and allow the camera sensor to warm up
print("[INFO] warming up camera...")
vs = VideoStream(usePiCamera=args["picamera"] > 0).start()
time.sleep(2.0)

# initialize the face detector, load the face recognizer, and set the confidence
# threshold
fd = FaceDetector(args["face_cascade"])
fr = FaceRecognizer.load(args["classifier"])
fr.setConfidenceThreshold(args["confidence"])

# initialize the number of consecutive frames list that will keep track of (1) the
# name of the face in the image and (2) the number of *consecutive* frames the face
# has appeared in
consec = None

# initialize the color of the bounding box used for the face and the last time
# we sent an MMS notification
color = (0, 255, 0)
lastSent = None
Lines 28 and 29 load our JSON configuration file from disk and use the configuration to instantiate a TwilioNotifier object. We also initialize our VideoStream and allow the camera sensor to warm up on Lines 32-34.
From there, Lines 38-40 handle constructing our face detection and recognition pipeline.
We then initialize consec , a bookkeeping variable used to keep track of:
- The name of the face in the frame.
- The number of consecutive frames the face has appeared in.
Next comes the main processing loop:
# import the necessary packages
from __future__ import print_function
from pyimagesearch.face_recognition import FaceDetector
from pyimagesearch.face_recognition import FaceRecognizer
from pyimagesearch.notifications import TwilioNotifier
from pyimagesearch.utils import Conf
from imutils.video import VideoStream
import argparse
import datetime
import imutils
import time
import cv2

# construct the argument parser and parse command line arguments
ap = argparse.ArgumentParser()
ap.add_argument("-c", "--conf", required=True, help="path to configuration file")
ap.add_argument("-f", "--face-cascade", required=True, help="path to face detection cascade")
ap.add_argument("-m", "--classifier", required=True, help="path to the classifier")
ap.add_argument("-t", "--confidence", type=float, default=100.0,
	help="maximum confidence threshold for positive face identification")
ap.add_argument("-n", "--consec-frames", type=int, default=90,
	help="# of consecutive frames containing an unknown face before sending alert")
ap.add_argument("-p", "--picamera", type=int, default=-1,
	help="whether or not the Raspberry Pi camera should be used")
args = vars(ap.parse_args())

# load the configuration file and initialize the Twilio notifier
conf = Conf(args["conf"])
tn = TwilioNotifier(conf)

# initialize the video stream and allow the camera sensor to warm up
print("[INFO] warming up camera...")
vs = VideoStream(usePiCamera=args["picamera"] > 0).start()
time.sleep(2.0)

# initialize the face detector, load the face recognizer, and set the confidence
# threshold
fd = FaceDetector(args["face_cascade"])
fr = FaceRecognizer.load(args["classifier"])
fr.setConfidenceThreshold(args["confidence"])

# initialize the number of consecutive frames list that will keep track of (1) the
# name of the face in the image and (2) the number of *consecutive* frames the face
# has appeared in
consec = None

# initialize the color of the bounding box used for the face and the last time
# we sent an MMS notification
color = (0, 255, 0)
lastSent = None

# loop over the frames of the video
while True:
	# grab the next frame from the stream and initialize the intruder boolean
	frame = vs.read()
	intruder = False

	# resize the frame, convert the frame to grayscale, and detect faces in the frame
	frame = imutils.resize(frame, width=500)
	gray = cv2.cvtColor(frame, cv2.COLOR_BGR2GRAY)
	faceRects = fd.detect(gray, scaleFactor=1.1, minNeighbors=5, minSize=(100, 100))

	# draw the timestamp on the frame
	timestamp = datetime.datetime.now()
	ts = timestamp.strftime("%A %d %B %Y %I:%M:%S%p")
	cv2.putText(frame, ts, (10, frame.shape[0] - 10), cv2.FONT_HERSHEY_SIMPLEX,
		0.35, (0, 0, 255), 1)
This code block is fairly straightforward. We start looping over frames from our video stream, poll them one by one, pre-process the frame, and then detect faces in the image. We also draw the current timestamp on the frame .
Our next code block determines if there is an intruder or not:
# import the necessary packages
from __future__ import print_function
from pyimagesearch.face_recognition import FaceDetector
from pyimagesearch.face_recognition import FaceRecognizer
from pyimagesearch.notifications import TwilioNotifier
from pyimagesearch.utils import Conf
from imutils.video import VideoStream
import argparse
import datetime
import imutils
import time
import cv2

# construct the argument parser and parse command line arguments
ap = argparse.ArgumentParser()
ap.add_argument("-c", "--conf", required=True, help="path to configuration file")
ap.add_argument("-f", "--face-cascade", required=True, help="path to face detection cascade")
ap.add_argument("-m", "--classifier", required=True, help="path to the classifier")
ap.add_argument("-t", "--confidence", type=float, default=100.0,
	help="maximum confidence threshold for positive face identification")
ap.add_argument("-n", "--consec-frames", type=int, default=90,
	help="# of consecutive frames containing an unknown face before sending alert")
ap.add_argument("-p", "--picamera", type=int, default=-1,
	help="whether or not the Raspberry Pi camera should be used")
args = vars(ap.parse_args())

# load the configuration file and initialize the Twilio notifier
conf = Conf(args["conf"])
tn = TwilioNotifier(conf)

# initialize the video stream and allow the camera sensor to warm up
print("[INFO] warming up camera...")
vs = VideoStream(usePiCamera=args["picamera"] > 0).start()
time.sleep(2.0)

# initialize the face detector, load the face recognizer, and set the confidence
# threshold
fd = FaceDetector(args["face_cascade"])
fr = FaceRecognizer.load(args["classifier"])
fr.setConfidenceThreshold(args["confidence"])

# initialize the number of consecutive frames list that will keep track of (1) the
# name of the face in the image and (2) the number of *consecutive* frames the face
# has appeared in
consec = None

# initialize the color of the bounding box used for the face and the last time
# we sent an MMS notification
color = (0, 255, 0)
lastSent = None

# loop over the frames of the video
while True:
	# grab the next frame from the stream and initialize the intruder boolean
	frame = vs.read()
	intruder = False

	# resize the frame, convert the frame to grayscale, and detect faces in the frame
	frame = imutils.resize(frame, width=500)
	gray = cv2.cvtColor(frame, cv2.COLOR_BGR2GRAY)
	faceRects = fd.detect(gray, scaleFactor=1.1, minNeighbors=5, minSize=(100, 100))

	# draw the timestamp on the frame
	timestamp = datetime.datetime.now()
	ts = timestamp.strftime("%A %d %B %Y %I:%M:%S%p")
	cv2.putText(frame, ts, (10, frame.shape[0] - 10), cv2.FONT_HERSHEY_SIMPLEX,
		0.35, (0, 0, 255), 1)

	# loop over the face bounding boxes
	for (i, (x, y, w, h)) in enumerate(faceRects):
		# grab the face to predict and predict it
		face = gray[y:y + h, x:x + w]
		(prediction, confidence) = fr.predict(face)

		# if the consecutive frames list is None, or the prediction does not match the
		# name from the previous frame, re-initialize the list
		if consec is None:
			consec = [prediction, 1]
			color = (0, 255, 0)

		# if predicted face matches the name in the consecutive list, then update the
		# total count
		elif prediction == consec[0]:
			consec[1] += 1

		# if the prediction has been "unknown" for a sufficient number of frames,
		# then we have an intruder
		if consec[0] == "Unknown" and consec[1] >= args["consec_frames"]:
			# change the color of the bounding box and text
			color = (0, 0, 255)
			intruder = True
Line 70 loops over the detected faces in the frame. Lines 72 and 73 extract the face ROI and then pass the face on to our face identifier.
If the consec variable is None , we initialize it as a list, containing the name of the face and the number of consecutive frames the face has appeared in.
Otherwise, if the predicted face matches the name in consec , then we update the consecutive frame count.
Line 88 makes the all important check — has an intruder entered our video stream? If the predicted face is Unknown , and has been Unknown for a sufficient number of frames, then an intruder has been detected.
Next, let’s draw the bounding box + name of the face in the frame , followed by checking to see if (1) an intruder has been detected and (2) enough time has passed in between Twilio message sends:
# import the necessary packages
from __future__ import print_function
from pyimagesearch.face_recognition import FaceDetector
from pyimagesearch.face_recognition import FaceRecognizer
from pyimagesearch.notifications import TwilioNotifier
from pyimagesearch.utils import Conf
from imutils.video import VideoStream
import argparse
import datetime
import imutils
import time
import cv2

# construct the argument parser and parse command line arguments
ap = argparse.ArgumentParser()
ap.add_argument("-c", "--conf", required=True, help="path to configuration file")
ap.add_argument("-f", "--face-cascade", required=True, help="path to face detection cascade")
ap.add_argument("-m", "--classifier", required=True, help="path to the classifier")
ap.add_argument("-t", "--confidence", type=float, default=100.0,
	help="maximum confidence threshold for positive face identification")
ap.add_argument("-n", "--consec-frames", type=int, default=90,
	help="# of consecutive frames containing an unknown face before sending alert")
ap.add_argument("-p", "--picamera", type=int, default=-1,
	help="whether or not the Raspberry Pi camera should be used")
args = vars(ap.parse_args())

# load the configuration file and initialize the Twilio notifier
conf = Conf(args["conf"])
tn = TwilioNotifier(conf)

# initialize the video stream and allow the camera sensor to warm up
print("[INFO] warming up camera...")
vs = VideoStream(usePiCamera=args["picamera"] > 0).start()
time.sleep(2.0)

# initialize the face detector, load the face recognizer, and set the confidence
# threshold
fd = FaceDetector(args["face_cascade"])
fr = FaceRecognizer.load(args["classifier"])
fr.setConfidenceThreshold(args["confidence"])

# initialize the number of consecutive frames list that will keep track of (1) the
# name of the face in the image and (2) the number of *consecutive* frames the face
# has appeared in
consec = None

# initialize the color of the bounding box used for the face and the last time
# we sent an MMS notification
color = (0, 255, 0)
lastSent = None

# loop over the frames of the video
while True:
	# grab the next frame from the stream and initialize the intruder boolean
	frame = vs.read()
	intruder = False

	# resize the frame, convert the frame to grayscale, and detect faces in the frame
	frame = imutils.resize(frame, width=500)
	gray = cv2.cvtColor(frame, cv2.COLOR_BGR2GRAY)
	faceRects = fd.detect(gray, scaleFactor=1.1, minNeighbors=5, minSize=(100, 100))

	# draw the timestamp on the frame
	timestamp = datetime.datetime.now()
	ts = timestamp.strftime("%A %d %B %Y %I:%M:%S%p")
	cv2.putText(frame, ts, (10, frame.shape[0] - 10), cv2.FONT_HERSHEY_SIMPLEX,
		0.35, (0, 0, 255), 1)

	# loop over the face bounding boxes
	for (i, (x, y, w, h)) in enumerate(faceRects):
		# grab the face to predict and predict it
		face = gray[y:y + h, x:x + w]
		(prediction, confidence) = fr.predict(face)

		# if the consecutive frames list is None, or the prediction does not match the
		# name from the previous frame, re-initialize the list
		if consec is None:
			consec = [prediction, 1]
			color = (0, 255, 0)

		# if predicted face matches the name in the consecutive list, then update the
		# total count
		elif prediction == consec[0]:
			consec[1] += 1

		# if the prediction has been "unknown" for a sufficient number of frames,
		# then we have an intruder
		if consec[0] == "Unknown" and consec[1] >= args["consec_frames"]:
			# change the color of the bounding box and text
			color = (0, 0, 255)
			intruder = True

		# display the text prediction on the image, followed by drawing a bounding box
		# around the face
		text = "{}: {:.2f}".format(prediction, confidence)
		cv2.putText(frame, text, (x, y - 20), cv2.FONT_HERSHEY_SIMPLEX, 0.75, color, 2)
		cv2.rectangle(frame, (x, y), (x + w, y + h), color, 2)

		# check to see if we (1) have an intruder and (2) enough time has passed
		# between message sends
		if intruder:
			if lastSent is None or (timestamp - lastSent).seconds >= conf["wait_n_seconds"]:
				# send the frame via Twilio, and update the last send timestamp
				print("[INFO] intruder: {}".format(timestamp))
				tn.send(frame)
				lastSent = timestamp
Provided that we have labeled a face as an intruder, Lines 101-106 handle sending the entire frame to our smartphone via Amazon S3 + the Twilio API.
The remaining code block is used to display the output frame to our screen, as well as perform a bit of cleanup:
# import the necessary packages
from __future__ import print_function
from pyimagesearch.face_recognition import FaceDetector
from pyimagesearch.face_recognition import FaceRecognizer
from pyimagesearch.notifications import TwilioNotifier
from pyimagesearch.utils import Conf
from imutils.video import VideoStream
import argparse
import datetime
import imutils
import time
import cv2

# construct the argument parser and parse command line arguments
ap = argparse.ArgumentParser()
ap.add_argument("-c", "--conf", required=True, help="path to configuration file")
ap.add_argument("-f", "--face-cascade", required=True, help="path to face detection cascade")
ap.add_argument("-m", "--classifier", required=True, help="path to the classifier")
ap.add_argument("-t", "--confidence", type=float, default=100.0,
	help="maximum confidence threshold for positive face identification")
ap.add_argument("-n", "--consec-frames", type=int, default=90,
	help="# of consecutive frames containing an unknown face before sending alert")
ap.add_argument("-p", "--picamera", type=int, default=-1,
	help="whether or not the Raspberry Pi camera should be used")
args = vars(ap.parse_args())

# load the configuration file and initialize the Twilio notifier
conf = Conf(args["conf"])
tn = TwilioNotifier(conf)

# initialize the video stream and allow the camera sensor to warm up
print("[INFO] warming up camera...")
vs = VideoStream(usePiCamera=args["picamera"] > 0).start()
time.sleep(2.0)

# initialize the face detector, load the face recognizer, and set the confidence
# threshold
fd = FaceDetector(args["face_cascade"])
fr = FaceRecognizer.load(args["classifier"])
fr.setConfidenceThreshold(args["confidence"])

# initialize the number of consecutive frames list that will keep track of (1) the
# name of the face in the image and (2) the number of *consecutive* frames the face
# has appeared in
consec = None

# initialize the color of the bounding box used for the face and the last time
# we sent an MMS notification
color = (0, 255, 0)
lastSent = None

# loop over the frames of the video
while True:
	# grab the next frame from the stream and initialize the intruder boolean
	frame = vs.read()
	intruder = False

	# resize the frame, convert the frame to grayscale, and detect faces in the frame
	frame = imutils.resize(frame, width=500)
	gray = cv2.cvtColor(frame, cv2.COLOR_BGR2GRAY)
	faceRects = fd.detect(gray, scaleFactor=1.1, minNeighbors=5, minSize=(100, 100))

	# draw the timestamp on the frame
	timestamp = datetime.datetime.now()
	ts = timestamp.strftime("%A %d %B %Y %I:%M:%S%p")
	cv2.putText(frame, ts, (10, frame.shape[0] - 10), cv2.FONT_HERSHEY_SIMPLEX,
		0.35, (0, 0, 255), 1)

	# loop over the face bounding boxes
	for (i, (x, y, w, h)) in enumerate(faceRects):
		# grab the face to predict and predict it
		face = gray[y:y + h, x:x + w]
		(prediction, confidence) = fr.predict(face)

		# if the consecutive frames list is None, or the prediction does not match the
		# name from the previous frame, re-initialize the list
		if consec is None:
			consec = [prediction, 1]
			color = (0, 255, 0)

		# if predicted face matches the name in the consecutive list, then update the
		# total count
		elif prediction == consec[0]:
			consec[1] += 1

		# if the prediction has been "unknown" for a sufficient number of frames,
		# then we have an intruder
		if consec[0] == "Unknown" and consec[1] >= args["consec_frames"]:
			# change the color of the bounding box and text
			color = (0, 0, 255)
			intruder = True

		# display the text prediction on the image, followed by drawing a bounding box
		# around the face
		text = "{}: {:.2f}".format(prediction, confidence)
		cv2.putText(frame, text, (x, y - 20), cv2.FONT_HERSHEY_SIMPLEX, 0.75, color, 2)
		cv2.rectangle(frame, (x, y), (x + w, y + h), color, 2)

		# check to see if we (1) have an intruder and (2) enough time has passed
		# between message sends
		if intruder:
			if lastSent is None or (timestamp - lastSent).seconds >= conf["wait_n_seconds"]:
				# send the frame via Twilio, and update the last send timestamp
				print("[INFO] intruder: {}".format(timestamp))
				tn.send(frame)
				lastSent = timestamp

	# show the frame and record if the user presses a key
	cv2.imshow("Frame", frame)
	key = cv2.waitKey(1) & 0xFF

	# if the `q` key is pressed, break from the loop
	if key == ord("q"):
		break

# clean up the camera and close any open windows
cv2.destroyAllWindows()
vs.stop()
Running the security camera
Before we can execute our security_cam.py file, let’s look at the template alerts.json file:
{
	"aws_access_key_id": "XXXXX",
	"aws_secret_access_key": "XXXXX",
	"s3_bucket": "XXXXX",
	"twilio_sid": "XXXXX",
	"twilio_auth": "XXXXX",
	"twilio_to": "XXXXX",
	"twilio_from": XXXXX",
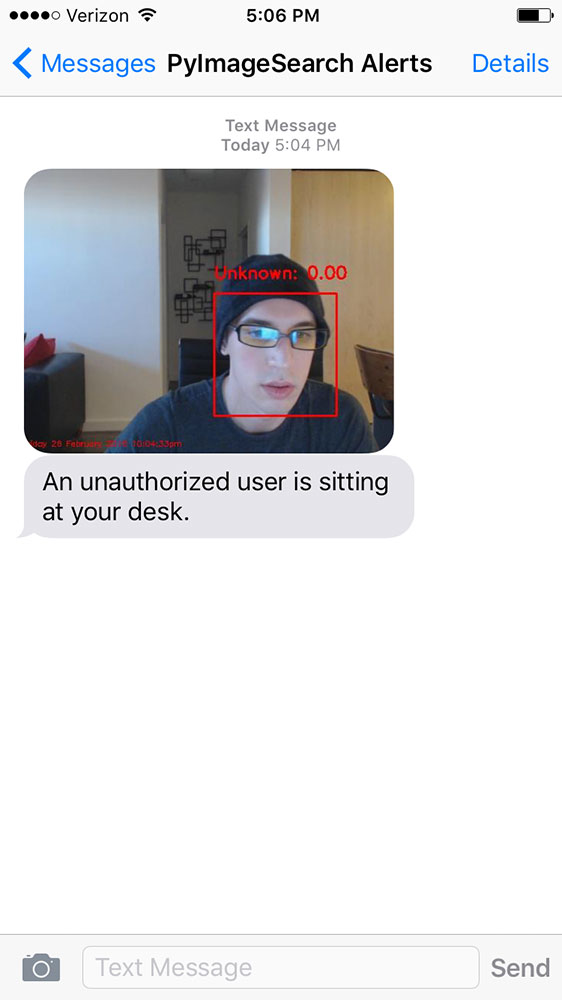
	"message_body": "An unauthorized user is sitting at your desk.",
	"wait_n_seconds": 300
}
You’ll need to fill in your own values wherever there is a value of XXXXX . The aws_access_key_id and aws_secret_acess_key can be generated/found by managing your authentication keys. The s3_bucket should be the name of a bucket you have created in your S3 account used to store images uploaded from your security_cam.py script.
The twilio_sid and twilio_auth values can be found on your Twilio Account page. Finally, twilio_to and twilio_from are used to define the phone number of the recipient and the sender, respectively.
After updating your alerts.json file and running both gather_selfies.py and train_recognizer.py , we are ready to start our security camera service.
If you are using a USB webcam, use the following command to kick-off the security camera:
$ python security_cam.py --face-cascade cascades/haarcascade_frontalface_default.xml \
	--classifier output/classifier --conf conf/alerts.json
Otherwise, supply the –picamera 1 flag to indicate that the Raspberry Pi camera module should be used instead:
$ python security_cam.py --face-cascade cascades/haarcascade_frontalface_default.xml \
	--classifier output/classifier --conf conf/alerts.json --picamera 1
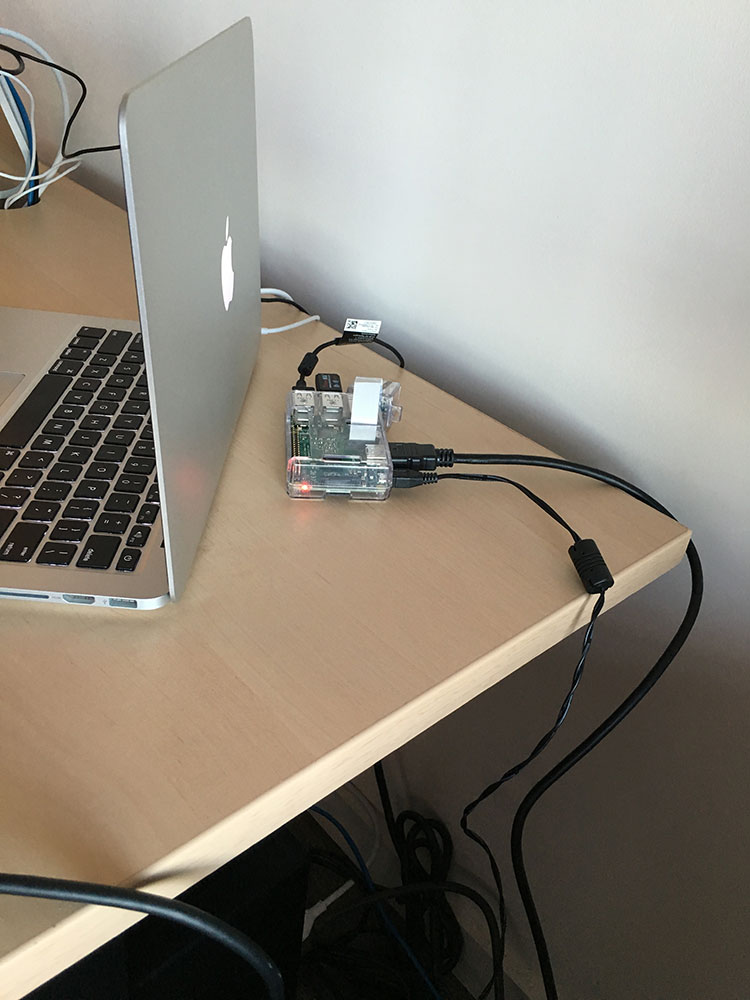
In this case, I’ve set up my Raspberry Pi to hide behind my laptop with an attached USB camera to monitor anyone who sits in front of my desk:
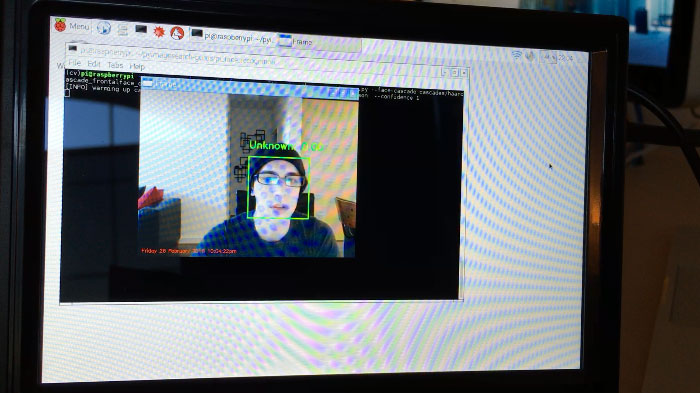
I’ve also included –confidence 1 in my command to ensure that my face is marked as an “intruder”. Obviously, in your own scripts, you won’t want to include such a slow confidence — but this is a good way to debug your script and ensure the proper actions are being triggered.
When I sit down in front of my laptop, my face is detected and is labeled as “unknown”:
However, after a sufficient number of frames have passed, I’m marked as an “intruder”. Notice how the color of the bounding box and text has changed from green to red:
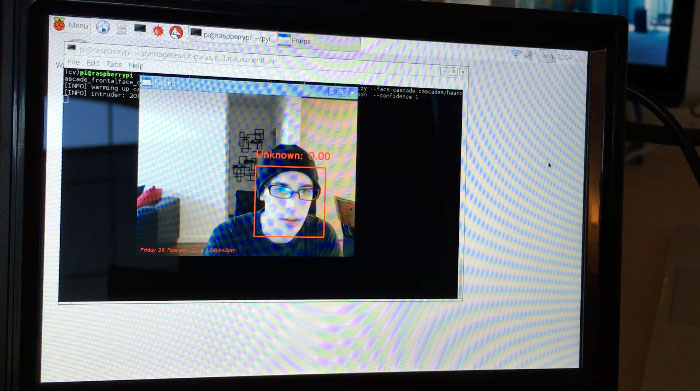
A few seconds later, I receive the following text message to my iPhone:
I have included a full video demonstration of the security_cam.py script below:
Summary
In this lesson, we learned how to build a simple security system utilizing:
- Our knowledge of face recognition from the face recognition module.
- The Raspberry Pi.
- The Twilio and Amazon S3 APIs.
If a face entered the view of our security camera, and the face could not be identified, a text message notification containing a snapshot of the intruder was sent to our smartphone device.
In order to guard against false-positive detections, we ensured that the “intruder” was marked as “Unknown” for a sufficient number of frames prior to sending this text message. Whenever implementing code that requires processing a video stream and deriving information from the frames, it’s good practice to ensure that an event, activity, or identification is taking place for a preset number of frames prior to sending an alert or taking further action.